Kubernetes – get started

****NOTE: This Post for installing is obsolete and there are more better ways to launch a k8s cluster.


Kubernetes is a system for managing containerized applications in a clustered environment. It provides basic mechanisms for deployment, maintenance and scaling of applications on public, private or hybrid setups. It also comes with self-healing features where containers can be auto provisioned, restarted or even replicated.

In this blog post, i’ll show you how to install a Kubernetes cluster with three minions on CentOS 7, with an example on how to manage pods and services.

Kubernetes Components

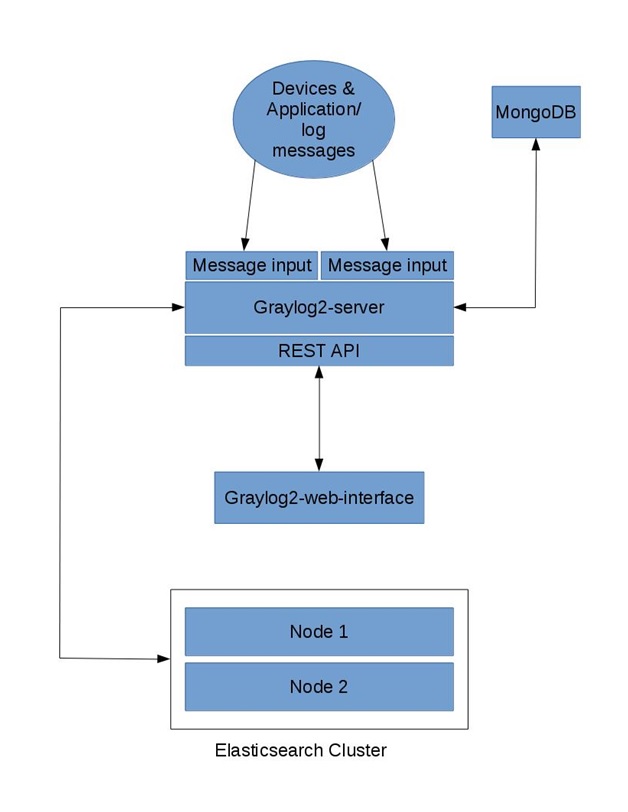
Kubernetes works in server-client setup, where it has a master providing centralized control for a number of minions. We will be deploying a Kubernetes master with three minions, as illustrated in the diagram further below.

Kubernetes has several components:

  • etcd – A highly available key-value store for shared configuration and service discovery.
  • flannel – An etcd backed network fabric for containers.
  • kube-apiserver – Provides the API for Kubernetes orchestration.
  • kube-controller-manager – Enforces Kubernetes services.
  • kube-scheduler – Schedules containers on hosts.
  • kubelet – Processes a container manifest so the containers are launched according to how they are described.
  • kube-proxy – Provides network proxy services.

Deployment on CentOS 7

We will need 4 servers, running on CentOS 7.1 64 bit with minimal install. All components are available directly from the CentOS extras repository which is enabled by default. The following architecture diagram illustrates where the Kubernetes components should reside:

Prerequisites

  1. Disable iptables on each node to avoid conflicts with Docker iptables rules:
$ systemctl stop firewalld

$ systemctl disable firewalld

  1. Install NTP and make sure it is enabled and running:
$ yum -y install ntp

$ systemctl start ntpd

$ systemctl enable ntpd

Setting up the Kubernetes Master (110.110.110.153)

The following steps should be performed on the master.

  1. Install etcd and Kubernetes through yum:
$ yum -y install etcd kubernetes
  1. Configure etcd to listen to all IP addresses inside /etc/etcd/etcd.conf. Ensure the following lines are uncommented, and assign the following values:
ETCD_NAME=default

ETCD_DATA_DIR=”/var/lib/etcd/default.etcd”

ETCD_LISTEN_CLIENT_URLS=”http://0.0.0.0:2379

ETCD_ADVERTISE_CLIENT_URLS=”http://localhost:2379

  1. Configure Kubernetes API server inside /etc/kubernetes/apiserver. Ensure the following lines are uncommented, and assign the following values:
KUBE_API_ADDRESS=”–address=0.0.0.0″

KUBE_API_PORT=”–port=8080″

KUBELET_PORT=”–kubelet_port=10250″

KUBE_ETCD_SERVERS=”–etcd_servers=http://127.0.0.1:2379

KUBE_SERVICE_ADDRESSES=”–service-cluster-ip-range=10.254.0.0/16″

KUBE_ADMISSION_CONTROL=”–admission_control=NamespaceLifecycle,NamespaceExists,LimitRanger,SecurityContextDeny,ResourceQuota”

KUBE_API_ARGS=””

  1. Start and enable etcd, kube-apiserver, kube-controller-manager and kube-scheduler:
$ for SERVICES in etcd kube-apiserver kube-controller-manager kube-scheduler; do

   systemctl restart $SERVICES

   systemctl enable $SERVICES

   systemctl status $SERVICES

done

  1. Define flannel network configuration in etcd. This configuration will be pulled by flannel service on minions:
$ etcdctl mk /atomic.io/network/config ‘{“Network”:”172.17.0.0/16″}’
  1. At this point, we should notice that nodes’ status returns nothing because we haven’t started any of them yet:
$ kubectl get nodes

NAME             LABELS              STATUS

Setting up Kubernetes Minions (Nodes)

The following steps should be performed on minion1, minion2 and minion3 unless specified otherwise.

  1. Install flannel and Kubernetes using yum:
$ yum -y install flannel kubernetes
  1. Configure etcd server for flannel service. Update the following line inside /etc/sysconfig/flanneld to connect to the respective master:


# Flanneld configuration options


# etcd url location.  Point this to the server where etcd runs

FLANNEL_ETCD=”http://110.110.110.153:2379″


# etcd config key.  This is the configuration key that flannel queries

# For address range assignment

FLANNEL_ETCD_KEY=”/atomic.io/network”


  1. Configure Kubernetes default config at /etc/kubernetes/config, ensure you update the KUBE_MASTER value to connect to the Kubernetes master API server:

# How the controller-manager, scheduler, and proxy find the apiserver

KUBE_MASTER=”–master=http://110.110.110.153:8080″


  1. Configure kubelet service inside /etc/kubernetes/kubelet as below:

minion:

# kubernetes kubelet (minion) config


# The address for the info server to serve on (set to 0.0.0.0 or “” for all interfaces)

KUBELET_ADDRESS=”–address=0.0.0.0″


# The port for the info server to serve on

KUBELET_PORT=”–port=10250″


# You may leave this blank to use the actual hostname

KUBELET_HOSTNAME=”–hostname-override=55.55.55.178″


# location of the api-server

KUBELET_API_SERVER=”–api-servers=http://110.110.110.153:8080″


# Add your own!

KUBELET_ARGS=””


  1. Start and enable kube-proxy, kubelet, docker and flanneld services:
$ for SERVICES in kube-proxy kubelet docker flanneld; do

   systemctl restart $SERVICES

   systemctl enable $SERVICES

   systemctl status $SERVICES

done

  1. On each minion, you should notice that you will have two new interfaces added, docker0 and flannel0. You should get different range of IP addresses on flannel0 interface on each minion, similar to below:

minion:

$ ip a | grep flannel | grep inet

inet 172.17.45.0/16 scope global flannel0


  1. Now login to Kubernetes master node and verify the minions’ status:

$ kubectl get nodes

NAME              LABELS                                   STATUS     AGE

110.110.110.152   kubernetes.io/hostname=110.110.110.152   Ready      28m

127.0.0.1         kubernetes.io/hostname=127.0.0.1         NotReady   10d

55.55.55.178      kubernetes.io/hostname=55.55.55.178      Ready      10d


You are now set. The Kubernetes cluster is now configured and running. We can start to play around with pods.

Creating Pods (Containers)

To create a pod, we need to define a yaml file in the Kubernetes master, and use the kubectl command to create it based on the definition. Create a mysql.yaml file:

$ mkdir pods

$ cd pods

$ vim mysql.yaml

And add the following lines:

#######################################

apiVersion: v1

kind: Pod

metadata:

 name: mysql

 labels:

    name: mysql

spec:

 containers:

    – resources:

       limits :

         cpu: 1

     image: mysql:latest

     name: mysql

     env:

       – name: MYSQL_ROOT_PASSWORD

         # change this

         value: secret

     ports:

       – containerPort: 3306

         name: mysql

############################


Create the pod:

$ kubectl create -f mysql.yaml

It may take a short period before the new pod reaches the Running state. Verify the pod is created and running:


$ kubectl get pods

NAME      READY     STATUS    RESTARTS   AGE

mysql     1/1       Running   0          17m


So, Kubernetes just created a Docker container on 192.168.50.132. We now need to create a Service that lets other pods access the mysql database on a known port and host.

Creating Service

At this point, we have a MySQL pod inside 192.168.50.132. Define a mysql-service.yaml as below:

####################################

apiVersion: v1

kind: Service

metadata:

 labels:

    name: mysql

 name: mysql

spec:

 type: NodePort

 ports:

    # the port that this service should serve on

    – port: 3306

     nodePort: 30001

     protocol: TCP

 # label keys and values that must match in order to receive traffic for this service

 selector:

    name: mysql

#####################################


Start the service:

$ kubectl create -f mysql-service.yaml

You should get a 10.254.x.x IP range assigned to the mysql service. This is the Kubernetes internal IP address defined in /etc/kubernetes/apiserver. This IP is not routable outside, so we defined the public IP instead (the interface that connected to external network for that minion):

$ kubectl get services

NAME         CLUSTER_IP       EXTERNAL_IP   PORT(S)    SELECTOR     AGE

kubernetes   10.254.0.1       <none>        443/TCP    <none>       14d

mysql        10.254.134.162   nodes         3306/TCP   name=mysql   18m
$ kubectl describe pod mysql
$ kubectl describe service mysql
Name:           mysql

Namespace:       default

Labels:           name=mysql

Selector:       name=mysql

Type:           NodePort

IP:           10.254.134.162

Port:           <unnamed>    3306/TCP

NodePort:       <unnamed>    30001/TCP

Endpoints:       10.20.21.2:3306

Session Affinity:    None

No events.

Let’s connect to our database server from outside (we used MariaDB client on CentOS 7):


mysql -uroot -p –port=30001 -h55.55.55.178

Enter password:

Welcome to the MariaDB monitor.  Commands end with ; or \g.

Your MySQL connection id is 5

Server version: 5.7.11 MySQL Community Server (GPL)


Copyright (c) 2000, 2015, Oracle, MariaDB Corporation Ab and others.


Type ‘help;’ or ‘\h’ for help. Type ‘\c’ to clear the current input statement.


MySQL [(none)]>


That’s it! You should now be able to connect to the MySQL container that resides on minion (55.55.55.178). Check out the Kubernetes examples contains a number of examples on how to run real applications with Kubernetes.


References:


https://www.vultr.com/docs/getting-started-with-kubernetes-on-centos-7

http://severalnines.com/blog/installing-kubernetes-cluster-minions-centos7-manage-pods-services

Problems:


Error – Pod “mysql” is forbidden: no API token found for service account default/default


solution or work around – Remove “ServiceAccount’’ in kubernetes API config /etc/kubernetes/apiserver


KUBE_ADMISSION_CONTROL=”–admission-control=NamespaceLifecycle,NamespaceExists,LimitRanger,SecurityContextDeny,ServiceAccount,ResourceQuota”


Command Line way of creating pods, services and replication controllers:

start a simple demo service, scale it to multiple instances and list its running pods:

# Create demo service
$ kubectl run service-demo –image=geku/go-app:0.1 –port=5000  
$ kubectl get pods -l run=service-demo

NAME                 READY     STATUS    RESTARTS   AGE

service-demo-ixlrc   1/1       Running   0          3m

# Scale service to 3 instances
$ kubectl scale rc service-demo –replicas=3  
$ kubectl get pods -l run=service-demo  
NAME                 READY     STATUS    RESTARTS   AGE

service-demo-df3el   1/1       Running   0          48s

service-demo-ixlrc   1/1       Running   0          4m

service-demo-l9zm8   1/1       Running   0          48s


The first command is actually a shortcut to create a ReplicationController which ensures we have the desired number of replicas running. With the last command we should see that Kubernetes started 3 instances of our service. We can list the ReplicationControllers too:

kubectl get rc  


So, after having a service running, we would like to access it. But this is not possible yet because the ports of our service instances are not exposed and only accessible on our virtual machine. Let’s expose our service on port 80:

$ kubectl expose rc service-demo –port=80 –target-port=5000 –type=NodePort  


This creates a load balancer and assigns our service a virtual IP where we can reach a random instance of our service. Additionally it maps it to a random port on our host server. To get the port run:

$ kubectl get -o yaml service/service-demo | grep nodePort
   nodePort: 31538


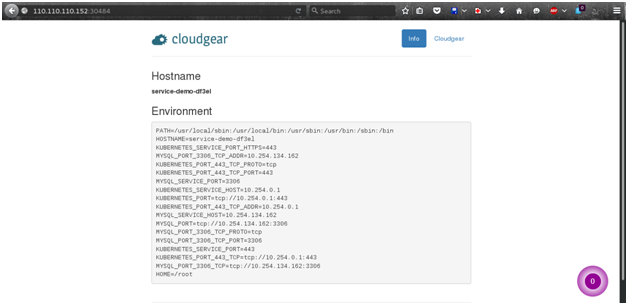
In our case we can reach our service on port 31538. This might be different on your machine and you need to change it in the following command.

110.110.110.152 is the IP of host running this pod

$ curl 110.110.110.152:31538/json
{“hostname”:”service-demo-mltul”,”env”:[“PATH=/usr/loc…

$ curl 110.110.110.152:31538/json
{“hostname”:”service-demo-gh4ej”,”env”:[“PATH=/usr/lo

By sending multiple requests you can see that they are answered by different instances (varying hostname).

To remove all pods and the service you run:

$ kubectl delete service/service-demo  
$ kubectl delete rc/service-demo

kube.png

Resize replicas

$ kubectl resize –current-replicas=2 –replicas=3 rc flocker-ghost

Edit yaml files and update

$ kubectl update -f mysql-pod.yaml

A list of SaaS, PaaS and IaaS offerings that have free tiers of interest to devops and infradev

free-for-dev

Developers and Open Source authors now have a massive amount of services offering free tiers, but it can be hard to find them all in order to make informed decisions.

This is list of software (SaaS, PaaS, IaaS, etc.) and other offerings that have free tiers for developers.

The scope of this particular list is limited to things infrastructure developers (System Administrator, DevOps Practitioners, etc.) are likely to find useful. We love all the free services out there, but it would be good to keep it on topic. It’s a bit of a grey line at times so this is a bit opinionated; do not be offended if I do not accept your contribution.

You can help by sending Pull Requests to add more services. Once I have a good set of links in this README file, I’ll look into a better layout for the information and links (help with that is appreciated too).

NOTE: This list is only for as-a-Service offerings, not for self hosted software.

Get the updated list here : https://github.com/ripienaar/free-for-dev

Jboss Clustering in AWS

           Jboss Clustering in AWS using S3ping for Node Discovery
We will be using Wildfly-8.2.0.Final (formerly jboss)

Domain Controller:

One Host Controller instance is configured to act as the central management point for the entire domain, i.e. to be the Domain Controller. The primary responsibility of the Domain Controller is to maintain the domain’s central management policy, to ensure all Host Controllers are aware of its current contents, and to assist the Host Controllers in ensuring any running application server instances are configured in accordance with this policy. This central management policy is stored by default in the domain/configuration/domain.xml file in the unzipped JBoss Application Server 7 installation on Domain Controller’s host’s filesystem.

A domain.xml file must be located in the domain/configuration directory of an installation that’s meant to run the Domain Controller. It does not need to be present in installations that are not meant to run a Domain Controller; i.e. those whose Host Controller is configured to contact a remote Domain Controller(usually a Slave). The presence of a domain.xml file on such a server does no harm.

The domain.xml file includes, among other things, the configuration of the various “profiles” that Wildfly 8 instances in the domain can be configured to run. A profile configuration includes the detailed configuration of the various subsystems that comprise that profile (e.g. an embedded JBoss Web instance is a subsystem; a JBossTS transaction manager is a subsystem, etc). The domain configuration also includes the definition of groups of sockets that those subsystems may open. The domain configuration also includes the definition of “server groups”:

Preparation:

We need to prepare two host, one for domain master and one host for slave

  • Launch two EC2 Centos OS 6 instances in aws.
  • Make sure that they are in same local network by using same Subnet groups.
  • Make sure that they can access each other via different TCP ports as AWS does not support multicast (also better turn off firewall and disable SELinux during the testing or they will cause network problems).

Scenario:

Here are some details on what we are going to do:

  • Let us call one host as ‘master’(ip:172.31.59.56) and httpd-server, the other one as ‘slave’(ip:172.31.48.75).
  • Both master and slave will run wildfly, and master will run as domain controller, slave will be under the domain management of master.
  • masters will write node information in already created s3 bucket for node discovery, slaves will be able to connect master nodes using s3 bucket info.
  • Apache httpd will be run on one of the masters, and in httpd we will enable the mod_cluster module. The wildfly on master and slave will form a cluster and discovered by httpd.
  • We will deploy a cluster-demo project into domain, and verify that the project is deployed into both master and slave by domain controller. Thus we could see that domain management provide us a single point to manage the deployments across multiple hosts in a single domain.
  • We will access the cluster URL and verify that httpd has distributed the request to one of the wildfly host. So we could see the cluster is working properly.
  • We will try to make a request on cluster, and if the request is forwarded to master wildfly, we then kill the wildfly process on master. After that we will go on requesting cluster and we should see the request is forwarded to slave, but the session is not lost. Our goal is to verify that HA is working and sessions are replicated.
  • After previous step finished, we reconnect the master wildfly by restarting it. We should see the master wildfly is registered back into cluster, also we should see slave wildfly sees master wildfly as domain controller again and connect to it. also slave will be able to reconnect master

jboss1

Download Wildfly:

Before downloading wildfly make sure that you have java 1.8 installed on both master and slave instances, if you don’t have, just enter this command.

yum install java-1.8.0-openjdk java-1.8.0-openjdk-devel

then “wget” wildfly package

wget http://download.jboss.org/wildfly/8.2.0.Final/wildfly-8.2.0.Final.tar.gz

unzip the downloaded package and move it to /usr/share/ location

tar zxf wildfly-8.2.0.Final.tar.gz -C /usr/share/

cd /usr/share/wildfly-8.2.0.Final/bin

./domain.sh

If everything ok we should see wildfly successfully startup in domain mode.

Now exit wildfly and let us repeat the same steps on slave host. Finally we get wildfly run on both master and slave, then we could move on to next step.

Domain Configuration:

configs on master:

In this section we will setup both master and slave for them to run in domain mode. And we will configure master to be the domain controller. Also we will add s3 information in both master  and slave.

  • First open the host.xml in master for editing:

vi domain/configuration/host.xml

The default settings for host.xml file is like:
<domain-controller>
<local/>
<!-- Alternative remote domain controller configuration with a host and port -->
<!-- <remote host="${jboss.domain.master.address}" port="${jboss.domain.master.port:9999}" security-realm="ManagementRealm"/> -->
</domain-controller>
<interfaces>
<interface name="management">
<inet-address value="${jboss.bind.address.management:127.0.0.1}"/>
</interface>
<interface name="public">
<inet-address value="${jboss.bind.address:127.0.0.1}"/>
</interface>
<interface name="unsecure">
<!-- Used for IIOP sockets in the standard configuration.
To secure JacORB you need to setup SSL -->
<inet-address value="${jboss.bind.address.unsecure:127.0.0.1}"/>
</interface>
</interfaces>
<server name="server-three" group="other-server-group" auto-start="false">
<!-- server-three avoids port conflicts by incrementing the ports in the default socket-group declared in the server-group -->
<socket-bindings port-offset="250"/>
</server>

  • We need to change the address to the management interface so slave could connect to master. The public interface allows the application to be accessed by non-local HTTP, and the unsecured interface allows remote RMI access. master ip address is 172.31.59.56, so change the config to:

<domain-controller>
<local>
<discovery-options>
<discovery-option name="s3-discovery1" code="org.jboss.as.host.controller.discovery.S3Discovery" module="org.jboss.as.host-controller">
<property name="access-key" value="xxxxxxxxxxxxxxx"/>
<property name="secret-access-key" value="xxxxxxxxxxxxxxxxxxxxxxxxxxxx"/>
<property name="location" value="jboss-config"/>
</discovery-option>
</discovery-options>
</local>
</domain-controller>
<interfaces>
<interface name="management">
<inet-address value="${jboss.bind.address.management:172.31.59.56}"/>
</interface>
<interface name="public">
<inet-address value="${jboss.bind.address:172.31.59.56}"/>
</interface>
<interface name="unsecure">
<!-- Used for IIOP sockets in the standard configuration.
To secure JacORB you need to setup SSL -->
<inet-address value="${jboss.bind.address.unsecure:172.31.59.56}"/>
</interface>
</interfaces>
<server name="server-three" group="other-server-group" auto-start="true">
<!-- server-three avoids port conflicts by incrementing the ports in the default socket-group declared in the server-group -->
<socket-bindings port-offset="250"/>
</server>

we have added s3 bucket name( you need to create bucket manually or use aws api ) as “location” and access keys and secret keys to the domain controller field. this configuration will make master to write node information file into s3 bucket.

Open domain.xml and edit mod_cluster subsystem wherever it is to:

vi domain/configuration/domain.xml

<subsystem xmlns="urn:jboss:domain:modcluster:1.2">
<mod-cluster-config advertise-socket="modcluster"connector="ajp"            sticky-session="false" proxy-list="172.31.59.56:10001">
<dynamic-load-provider>
<load-metric type="cpu"/>
</dynamic-load-provider>
</mod-cluster-config>
</subsystem>
</subsystem>
<subsystem xmlns="urn:jboss:domain:jdr:1.0"/>
<subsystem xmlns="urn:jboss:domain:jgroups:2.0" default-stack="tcp">

In Jgroups subsystem change default-stack to “tcp” from “udp”. As AWS Does Not support Multicasting. Also Frag_size should be < 32k,

we will now configure slave to use this s3 bucket for clustering.
configs on Slave:

  • First edit host.xml

vi domain/configuration/host.xml

  • The configuration we will use on slave is a little bit different, because we need to let slave connect to master. First we need to set the hostname. We change the name property from:

<host name="master" xmlns="urn:jboss:domain:2.2">
to
<host name="slave" xmlns="urn:jboss:domain:2.2">

  • Then we need to modify domain-controller section so slave can connect to master management port:

<domain-controller>
<remote security-realm="ManagementRealm">
<discovery-options>
<discovery-option name="s3-discovery" code="org.jboss.as.host.controller.discovery.S3Discovery" module="org.jboss.as.host-controller">
<property name="access-key" value="xxxxxxxxxxxxxxxx"/>
<property name="secret-access-key" value="xxxxxxxxxxxxxxxxxxxxxxxxxxx"/>
<property name="location" value="jboss-config"/>
</discovery-option>
<discovery-option name="s3-discovery1" code="org.jboss.as.host.controller.discovery.S3Discovery" module="org.jboss.as.host-controller">
<property name="access-key" value="xxxxxxxxxxxxxxxx"/>
<property name="secret-access-key" value="xxxxxxxxxxxxxxxxxxxxxxxxxxx"/>
<property name="location" value="jboss-config1"/>
</discovery-option>
</discovery-options>
</remote>
</domain-controller>

Here i have added two master s3 discovery options, A slave can now be configured with multiple options for contacting a master domain controller. Currently, any number of S3 discovery options are supported. Whenever a host controller needs to contact the master domain controller, it will now loop through the provided options, in order. The first option provided should be the one that’s expected to succeed. The remaining discovery options can be used in failover situations. For example, if the primary domain controller fails, a backup can be brought online as the new domain controller and the slaves will be able to connect to it without requiring any configuration changes.

  • Finally, we also need to configure interfaces section and expose the management ports to public address:

<interfaces>
<interface name="management">
<inet-address value="${jboss.bind.address.management:172.31.48.75}"/>
</interface>
<interface name="public">
<inet-address value="${jboss.bind.address:172.31.48.75}"/>
</interface>
<interface name="unsecure">
<!-- Used for IIOP sockets in the standard configuration.
To secure JacORB you need to setup SSL -->
<inet-address value="${jboss.bind.address.unsecure:172.31.48.75}"/>
</interface>
</interfaces>
</server>
<server name="server-three-slave" group="other-server-group"        auto-start="true">
<!-- server-three avoids port conflicts by incrementing the ports in
the default socket-group declared in the server-group -->
<socket-bindings port-offset="250"/>
</server>

Security Configuration:
If you start wildfly on both master and slave now, you will see the slave wildfly cannot be started with following error:
[Host Controller] 20:31:24,575 ERROR [org.jboss.remoting.remote] (Remoting "endpoint" read-1) JBREM000200: Remote connection failed: javax.security.sasl.SaslException: Authentication failed: all available authentication mechanisms failed
[Host Controller] 20:31:24,579 WARN  [org.jboss.as.host.controller] (Controller Boot Thread) JBAS010900: Could not connect to remote domain controller 10.211.55.7:9999
[Host Controller] 20:31:24,582 ERROR [org.jboss.as.host.controller] (Controller Boot Thread) JBAS010901: Could not connect to master. Aborting. Error was: java.lang.IllegalStateException: JBAS010942: Unable to connect due to authentication failure.

Because we have not properly set up the authentication between master and slave. Now let us work on it:

Master

  • In bin directory there is a script called add-user.sh, we will use it to add new users to the properties file used for domain management authentication:

./add-user.sh
Enter the details of the new user to add.
Realm (ManagementRealm) :
Username : admin
Password : 123
Re-enter Password : 123
The username 'admin' is easy to guess
Are you sure you want to add user 'admin' yes/no? yes
About to add user 'admin' for realm 'ManagementRealm'
Is this correct yes/no? yes
Added user 'admin' to file '/usr/share/wildfly-8.2.0.Final/standalone/configuration/mgmt-users.properties'
Added user 'admin' to file '/usr/share/wildfly-8.2.0.Final/domain/configuration/mgmt-users.properties'

As shown above, we have created a user named ‘admin’ and its password is ‘123’. Then we add another user called ‘slave’:

./add-user.sh
Enter the details of the new user to add.
Realm (ManagementRealm) :
Username : slave
Password : 123
Re-enter Password : 123
About to add user 'slave' for realm 'ManagementRealm'
Is this correct yes/no? yes
Added user 'slave' to file '/usr/share/wildfly-8.2.0.Final/standalone/configuration/mgmt-users.properties'
Added user 'slave' to file '/usr/share/wildfly-8.2.0.Final/domain/configuration/mgmt-users.properties'

Slave

  • In slave we need to configure host.xml for authentication. We should change the security-realms section as following:

<security-realms>
<security-realm name="ManagementRealm">
<server-identities>
<secret value="MTIz"/>
</server-identities>
<authentication>
<properties path="mgmt-users.properties"           relative-to="jboss.domain.config.dir"/>
</authentication>
</security-realm>
</security-realms>

  • Update host.xml servers node:

</server>
<server name="server-three-slave" group="other-server-group"       auto-start="true">
<!-- server-three avoids port conflicts by incrementing the ports in the default socket-group declared in the server-group -->
<socket-bindings port-offset="250"/>

Dry Run:

Now everything is set for the two hosts to run in domain mode. Let us start them by running domain.sh on both hosts. If everything goes fine, we could see from the log on master:

[Host Controller] 0m12:48:27,478 INFO  [org.jboss.as.domain] (Host Controller Service Threads - 1) JBAS010918: Registered remote slave host "slave", WildFly 8.2.0.Final "Tweek"

logs on Slave shows:

[Host Controller] 09:57:01,296 INFO [org.jboss.as.host.controller] (Host Controller Service Threads - 81) JBAS016582: Connected to master host controller at remote://172.31.59.56:9999
if you see in s3 bucket, a jboss file is created inside master folder.

jboss2

Cluster Configuration:

mod_cluster can  be configure in a separate instance or like here, we have configured in master itself. same httpd configuration in either methods except that in separate instance method ,  “httpd+mod_cluter” instance ip address should be added into master’s domain.xml file’s mod_cluster subsystem to “Proxy-list”.

  • Download mod_cluster binary package:

wget http://downloads.jboss.org/mod_cluster//1.2.6.Final/linux-x86_64/mod_cluster-1.2.6.Final-linux2-x64-so.tar.gz

  • Install Httpd using:

yum install httpd

  • unpack the downloaded mod_cluster package and copy modules to /etc/httpd/modules
  • Now Edit Httpd conf:

vi /etc/httpd/conf/httpd.conf

add below configuration at the end of the file

############### mod_cluster Setting - STARTED ###############
LoadModule slotmem_module modules/mod_slotmem.so
LoadModule manager_module modules/mod_manager.so
LoadModule proxy_cluster_module modules/mod_proxy_cluster.so
LoadModule advertise_module modules/mod_advertise.so
Listen 172.31.59.56:10001
<VirtualHost 172.31.59.56:10001>
<Directory />
Order deny,allow
Allow from 172.31.
</Directory>
<Location /mod_cluster_manager>
SetHandler mod_cluster-manager
Order deny,allow
Allow from 172.31.
</Location>
KeepAliveTimeout 300
MaxKeepAliveRequests 0
AllowDisplay On
ManagerBalancerName other-server-group
AdvertiseFrequency 5
ServerAdvertise On 172.31.59.56:10001
EnableMCPMReceive
</VirtualHost>
############### mod_cluster Setting - ENDED ###############

Now start the httpd server
service httpd start

**** Here 52.7.74.3 is the public ipaddress for 172.31.59.56 master (also httpd)instance

Deployment:

  • Now we can deploy a demo project into the domain. Here is a simple project located at:

https://github.com/liweinan/cluster-demo

  • We can use git command to fetch a copy of the demo:

git clone git://github.com/liweinan/cluster-demo.git

  • In this demo project we have a very simple web application. In web.xml there is a <distributable/> setting , please remove it , as compiled application cannot be deployed successfully in wildfly-8.2.0.Final
  • Now we need to create a war from it. In the project directory, run the following command to get the war in ‘target’ folder:

mvn clean compile install

  • Then we need to deploy the cluster-demo.war into domain. First we should access the http management console on master (Because master is acting as domain controller):

http://52.7.74.3:9990

  • It will popup a window asking you to input account name and password, we can use the ‘admin’ account which was already created. After logging in we could see the ‘Domain’ tab. we could see server instances, its groups and hosts. By default there server-one listed in running status.
  • see that the other server group’s server-three with profile “full-ha” should be in running state for ha mode.
  • Entering ‘Deployments’ tab, click ‘Add’ at top right corner. Then we should choose our cluster-demo.war, and follow the instruction to add it into our content repository.
  • Now we can see cluster-demo.war is added. Next we click ‘Add to Groups’ button and add the war to ‘main-server-group’ and then click ‘save’.Wait a few seconds, management console will tell you that the project is deployed into ‘main-server-group’
  • If everything goes well, you can visit URL, you will see two nodes(master, slave and its three servers) are added and active:

http://52.7.74.3:10001/mod_cluster-manager

This will list all the node servers associated with specific groups

jboss3
Note: In AWS you just cannot access httpd or jboss management interfaces directly, you need to use instance public address and see that you have access rules set in security groups to allow you.

**** Here 52.7.74.3 is the public ipaddress for 172.31.59.56 master (also httpd)instance

Testing:

  • access the cluster

http://52.7.74.3/cluster-demo/put.jsp

jboss4

  • We should see the request is distributed to one of the hosts(master or slave) from the wildfly domain controller log

[Server:server-three-slave] 14:14:30,262 INFO  [stdout] (default task-2) Putting date now

  • Killing the master server by using system commands will have the effect that the Host-Controller restart the instance immediately.
  • Then wait for a few seconds and access cluster:

http://52.7.74.3/cluster-demo/get.jsp

  • Now the request should be served by slave and we should see the log from slave wildfly:

[Server:server-three-slave] 14:15:08,067 INFO  [stdout] (default task-3) Getting date now

jboss5
And from the get.jsp we should see that the time we get is the same we’ve put by ‘put.jsp’. Thus it’s proven that the session is correctly replicated to slave.

Now we restart master and should see the host is registered back to cluster.
It doesn’t matter if you found the request is distributed to slave at first time. Then just disconnect slave and do the testing, the request should be sent to master instead. The point is we should see the request is redirected from one host to another and the session is held.

Adding more slaves to the master(domain-controller):

To add more slaves, all we need is to create an another user in master domain controller using the add-user.sh script , see that you provide a unique username.

  • Now create another instance with the AMI Created from any already joined slave instance or you could just create an instance and install wildfly.Edit host.xml

<?xml version='1.0' encoding='UTF-8'?>

<host name=”slave2″ xmlns=”urn:jboss:domain:2.2″>
…………………..
<server-identities>
<secret value=”MTIz=”/>
</server-identities>
…………………..
<interfaces>
<interface name=”management”>
<inet-address value=”${jboss.bind.address.management:172.31.48.31}”/>
</interface>
<interface name=”public”>
<inet-address value=”${jboss.bind.address:172.31.48.31}”/>
</interface>
<interface name=”unsecure”>
<!– Used for IIOP sockets in the standard configuration.
To secure JacORB you need to setup SSL –>
<inet-address value=”${jboss.bind.address.unsecure:172.31.48.31}”/>
</interface>
</interfaces>


See hostname=”slave2” which is unique than already connected slave.
secret value should be added which is the  base64 code of your password , you will get this when you create a “slave2” user in master domain controller. or you could just generate it here http://www.webutils.pl/index.php?idx=base64
Here the password is “123” so “MTIz”.

Instance private IP address has to be added into Interfaces field.

  • run domain.sh script and  see that your slave2 connected in master domain controller in the terminal and web management.

jboss6

Auto-scaling:

Based on your requirement you can create images of both Slave and Master, set auto-scaling  policies and set cloud alarms based on CPU utilization.

Detail inforamtion is provided here:

http://aws.typepad.com/awsaktuell/2013/10/elastic-jboss-as-7-clustering-in-aws-using-ec2-s3-elb-and-chef.html

DevOps Tools

Here are some of the DevOps tools.

  1. Operating Systems
    1. Linux (RHELCentOSUbuntuDebian)
    2. Unix (SolarisAIXHP/UX, etc.)
    3. Windows
    4. Mac OS X
  2. Infrastructure as a Service
    1. Amazon Web Services
    2. Rackspace
    3. Cloud Foundry
    4. Azure
    5. OpenStack
  3. Virtualization Platforms
    1. VMware
    2. KVM
    3. Xen
    4. VirtualBox
    5. Vagrant
  4. Containerization Tools
    1. LXC
    2. Solaris Containers
    3. Docker
  5. Linux OS Installation
    1. Kickstart
    2. Cobbler
    3. Fai
  6. Configuration Management
    1. Puppet / MCollective
    2. Chef
    3. Ansible
    4. CFEngine
    5. SaltStack
    6. RANCID
    7. Ubuntu Juju
  7. Test and Build Systems
    1. Jenkins
    2. Maven
    3. Ant
    4. Gradle
  8. Application Deployment
    1. Capistrano
  9. Application Servers
    1. JBoss
    2. Tomcat
    3. Jetty
    4. Glassfish
    5. Websphere
    6. Weblogic
  10. Web Servers
    1. nginx
    2. Apache
    3. IIS
  11. Queues, Caches, etc.
    1. ActiveMQ
    2. RabbitMQ
    3. memcache
    4. varnish
    5. squid
  12. Databases
    1. Percona Server
    2. MySQL
    3. PostgreSQL
    4. OpenLDAP
    5. MongoDB
    6. Cassandra
    7. Redis
    8. Oracle
    9. MS SQL
  13. Monitoring, Alerting, and Trending
    1. New Relic
    2. Nagios
    3. Icinga
    4. Graphite
    5. Ganglia
    6. Cacti
    7. PagerDuty
    8. Sensu
    9. Zabbix
    10. Solarwinds
    11. Application Manager
  14. Logging
    1. PaperTrail
    2. Logstash
    3. Loggly
    4. Splunk
    5. SumoLogic
  15. Process Supervisors
    1. Monit
    2. runit
    3. Supervisor
    4. god
    5. Blue Pill
    6. Upstart
    7. systemd
  16. Security
    1. Snorby Threat Stack
    2. Tripwire
    3. Snort
  17. Miscellaneous Tools
    1. Multihost SSH Wrapper
    2. Code Climate
    3. iPerf
    4. lldpd

got this useful information from http://newrelic.com/devops/toolset

Graylog With Elasticsearch Cluster (Two nodes)

Introduction:


Graylog (formerly known as Graylog2) is an open source log management platform, helps you to collect, index and analyze any machine logs from monitoring SSH logins and unusual activity to debugging applications on a centralized location. This guide helps you to install Graylog2 on CentOS 6.6 also focus on installation of four other components that makes Graylog2 a power full log management tool.

  1. MongoDB – Stores the configurations and meta information.
  1. Elasticsearch – Elasticsearch is an enterprise level open source search server based on Apache Lucene, it offers a real-time distributed search and analytics with a RESTful web interface and schema-free JSON documents. Elasticsearch is developed in java and is released under Apache License. It stores log messages and offers a searching facility, nodes should have high memory as all the I/O operations are happens here. Its performance is RAM and disk I/O dependent.
  1. GrayLog Server – Log parser, Serves as a worker that receives and processes messages, and communicates with all other non-server components. Its performance is CPU dependent
  1. GrayLog Web interface – provides you the web-based portal for managing the logs.


We are implementing a minimal architecture setup that can be used for smaller, non-critical, or test setups. None of the components is redundant but it is easy and quick to setup.

                                   Graylog Setup with Two Elasticsearch Cluster

graylog

Installing Elasticsearch:

Since the Elasticsearch is based on java,we would require to install either openJDK or Oracle      JDK
        # yum install java-1.7.0-openjdk

Download Elasticsearch using wget or directly download from its website
       # wget https://download.elastic.co/elasticsearch/elasticsearch/elasticsearch-1.5.0.tar.gz

extract the package

        #  tar -zxf elasticsearch-1.5.0.tar.gz

        # mv elasticsearch-1.5.0 elasticsearch

#  cd elasticsearch/config

#  vi elasticsearch.yml

and configure the following


node.name: "graylog2_elasticsearch_inst1"
node.master: true
index.number_of_replicas: 1
index.number_of_shards: 2
script.disable_dynamic: true
cluster.name: "graylog2"
transport.tcp.port: "10101"
discovery.zen.ping.unicast.hosts: ["30.30.30.129"]
discovery.zen.ping.multicast.enabled: false
http.port: "10102"

configure the same with the second elasticsearch node

node.name: "graylog2_elasticsearch_inst2"
node.master: true
index.number_of_replicas: 1
index.number_of_shards: 2
script.disable_dynamic: true
cluster.name: "graylog2"
transport.tcp.port: "10101"
discovery.zen.ping.unicast.hosts: ["30.30.30.60"]
discovery.zen.ping.multicast.enabled: false
http.port: "10102"


Settings Explanation:

  • node.name- Should be the name of the elasticsearch node
  • index.number_of_replicas – Is set to 1(default)
  • node.master- This is set to “true” simply indicates that this node is capable of being a master. ElasticSearch cluster itself elects a master from the current member nodes.
  • cluster.name – Should be “graylog2”
  • discovery.zen.ping.unicast.hosts – Is mainly used to restrict cluster membership,will contain all the nodes that are eligible to form a cluster. By default is should contain your IP address or hostname
  • script.disable_dynamic- By default dynamic scripting is disabled in elasticsearch, we need to set it to “false”. Also we need to make sure when we are enabling dynamic scripting, the elasticsearch ports are not public. specially the port used by nodes for communication. (9300 by default) Otherwise it has security vulnerability and allows attackers to join the cluster and do port scanning or make DDOS attacks.
  • discovery.zen.ping.multicast.enabled – By default elasticsearch uses multicast to determine other cluster members. It lets anyone in the multicast domain gain access to your cluster. Should be set to “false”.
  • transport.tcp.port: “10101”- graylog will look for the elasticsearch cluster on this port.
  • http.port – elasticsearch will bind to this port.

         # cd ..
         # cd bin

         # ./elasticsearch

[2015-04-14 15:19:58,581][INFO ][node                     ] [graylog2_elasticsearch_inst1] version[1.5.0], pid[1238], build[5448160/2015-03-23T14:30:58Z]

[2015-04-14 15:19:58,582][INFO ][node                     ] [graylog2_elasticsearch_inst1] initializing …

[2015-04-14 15:19:58,590][INFO ][plugins                  ] [graylog2_elasticsearch_inst1] loaded [], sites []

[2015-04-14 15:20:02,677][INFO ][node                     ] [graylog2_elasticsearch_inst1] initialized

[2015-04-14 15:20:02,678][INFO ][node                     ] [graylog2_elasticsearch_inst1] starting …

[2015-04-14 15:20:02,861][INFO ][transport                ] [graylog2_elasticsearch_inst1] bound_address {inet[/0:0:0:0:0:0:0:0:10101]}, publish_address {inet[/30.30.30.129:10101]}

[2015-04-14 15:20:02,883][INFO ][discovery                ] [graylog2_elasticsearch_inst1] graylog2/GTUEMA0LTNWhrAFdSUioDA

[2015-04-14 15:20:05,984][INFO ][cluster.service          ] [graylog2_elasticsearch_inst1] new_master [graylog2_elasticsearch_inst1][GTUEMA0LTNWhrAFdSUioDA][localhost.localdomain][inet[/30.30.30.129:10101]]{master=true}, reason: zen-disco-join (elected_as_master)

[2015-04-14 15:20:06,045][INFO ][http                     ] [graylog2_elasticsearch_inst1] bound_address {inet[/0:0:0:0:0:0:0:0:10102]}, publish_address {inet[/30.30.30.129:10102]}

[2015-04-14 15:20:06,046][INFO ][node                     ] [graylog2_elasticsearch_inst1] started

[2015-04-14 15:20:07,640][INFO ][gateway                  ] [graylog2_elasticsearch_inst1] recovered [1] indices into cluster_state

This will launch elasticsearch and try to discover any nodes and also elects a master from the available nodes(only eligible). Its the same procedure to launch the second node or any additional nodes.


To Check the Health of the elasticsearch cluster node, type this command, replace Ipaddress with the node ip address and http port that you have added in your elasticsearch.yml file

       # curl -XGET 'http://ipaddress:port/_cluster/health?pretty=true'

{
 “cluster_name” : “graylog2”,
 “status” : “green”,
 “timed_out” : false,
 “number_of_nodes” : 3,
 “number_of_data_nodes” : 2,
 “active_primary_shards” : 2,
 “active_shards” : 2,
 “relocating_shards” : 0,
 “initializing_shards” : 0,
 “unassigned_shards” : 0,
 “number_of_pending_tasks” : 0

}

Installing MongoDB:

MongoDB is available in RPM format and same can be downloaded from the official website. Add the following repository information on the system to install MongoDB using yum..

         # vi /etc/yum.repos.d/mongodb.repo


          [mongodb]

          name=MongoDB repo
          baseurl=http://downloads-distro.mongodb.org/repo/redhat/os/x86_64/
          gpgcheck=0
          enabled=1     

         # yum install mongodb-org

         # service mongod start

         # chkconfig mongod on

Launching Graylog Server:

Graylog-server accepts and process the log messages, also spawns the REST API for the requests that comes from graylog-web-interface. Download the latest version of graylog from graylog.org, use the following command to download using terminal.

         # wget https://packages.graylog2.org/releases/graylog2-server/graylog-1.0.1.tgz

         # tar -zxvf graylog-1.0.1.tgz

Rename the directory to “graylog”.

         # mv graylog-1.0.1 graylog

         # cd graylog

Copy the sample configuration file to /etc/graylog/server, create the directory if it does not exists.

         # mkdir -p /etc/graylog/server

         # cp graylog.conf.example /etc/graylog/server/server.conf

Edit the server.conf file.

         # vi /etc/graylog/server/server.conf

Configure the following variables in the above file.

Set a secret to secure the user passwords, use the following command to generate a secret, use at least 64 character’s.

         # pwgen -N 1 -s 96

F5158A69EC0A1C34C4E30A2912C435E229E095B0C66BA1F5053F4C1F3637E8EBC987E8B77A395610B4BED3B794275AD2EE73E5E0001F26E084384105AEB15725F8FFCAAEC3FD037B7756EBF33B795AD38BF78AC844402C166BE9AB258932A468ED05A03C

If you get a “pwgen: command not found“, use the following command to install pwgen.

         # yum -y install pwgen

Place the secret.

password_secret=F5158A69EC0A1C34C4E30A2912C435E229E095B0C66BA1F5053F4C1F3637E8EBC987E8B77A395610B4BED3B794275AD2EE73E5E0001F26E084384105AEB15725F8FFCAAEC3FD037B7756EBF33B795AD38BF78AC844402C166BE9AB258932A468ED05A03C

Next is to set a hash password for the root user (not to be confused with system user, root user of graylog is admin). You will use this password for login into the web interface, admin’s password can not be changed using web interface, must edit this variable to set.

Replace “yourpassword” with the choice of your’s.

         # echo -n yourpassword | sha256sum

ca978112ca1bbdcafac231b39a23dc4da786eff8147c4e72b9807785afee48b

Place the hash password.

root_password_sha2 = ca978112ca1bbdcafac231b39a23dc4da786eff8147c4e72b9807785afee48b

your server.conf should look like this

node_id_file=run/graylog-node-id
password_secret=F5158A69EC0A1C34C4E30A2912C435E229E095B0C66BA1F5053F4C1F3637E8EBC987E8B77A395610B4BED3B794275AD2EE73E5E0001F26E084384105AEB15725F8FFCAAEC3FD037B7756EBF33B795AD38BF78AC844402C166BE9AB258932A468ED05A03C
root_username=root
root_password_sha2=ca978112ca1bbdcafac231b39a23dc4da786eff8147c4e72b9807785afee48bb
rest_listen_uri=http://127.0.0.1:12900/
elasticsearch_shards=2
elasticsearch_replicas=1
allow_leading_wildcard_searches=true
allow_highlighting=true
elasticsearch_cluster_name=graylog2
elasticsearch_discovery_zen_ping_multicast_enabled=false
elasticsearch_discovery_zen_ping_unicast_hosts=30.30.30.129:10101,30.30.30.60:10101
mongodb_useauth=false
mongodb_host=127.0.0.1
mongodb_port=27017
mongodb_database=graylog_setup

Settings Explanation:

  • rest_listen_uri – REST API listen URI. Must be reachable by other graylog2-server nodes if you run a cluster.
  • elasticsearch_shards – Shards setting depends on the number of nodes in the Elasticsearch cluster, if you have only one node, set it as 1. Here we have 2 nodes so 2 shards.
  • elasticsearch_replicas – The number of replicas for your indices, if you have only one node in Elasticsearch cluster; set it as 0. Here we have 2 Elasticsearch nodes so 1 replicas.
  • elasticsearch_discovery_zen_ping_multicast_enabled – Graylog will try to find the Elasticsearch nodes automatically, it uses multicast mode for the same. But when it comes to larger network, it is recommended to use unicast mode which is best suited one for production setups.
  • elasticsearch_discovery_zen_ping_unicast_hosts – multiple Elasticsearch nodes can be added with comma separated.
  • mongodb_useauth, mongodb_host, mongodb_port, mongodb_database – Your MongoDB settings here , add IP address and port of the system that runs mongodb.


Start the graylog server using the following command.

         # ./bin/graylogctl start

You can check out the server startup logs, it will be useful for you to troubleshoot the graylog in case of any issue.

         # tailf log/graylog-server.log

On successful start of graylog-server, you should get the following message in the log file.

2015-04-15 14:20:22,345 INFO : org.elasticsearch.cluster.service – [graylog2-server] detected_master [graylog2_elasticsearch_inst1][oOkTNsx7SHmTh0t97A3gTQ][localhost.localdomain][inet[/30.30.30.129:10101]]{master=true}, added {[graylog2_elasticsearch_inst1][oOkTNsx7SHmTh0t97A3gTQ][localhost.localdomain][inet[/30.30.30.129:10101]]{master=true},[graylog2_elasticsearch_inst2][OBcO-UqfRrqXnMwI6KANJg][localhost.localdomain][inet[/30.30.30.60:10101]]{master=true},}, reason: zen-disco-receive(from master [[graylog2_elasticsearch_inst1][oOkTNsx7SHmTh0t97A3gTQ][localhost.localdomain][inet[/30.30.30.129:10101]]{master=true}])

2015-04-15 14:20:28,148 INFO : org.graylog2.shared.initializers.ServiceManager Listener – Services are healthy

2015-04-15 14:20:28,191 INFO : org.graylog2.bootstrap.ServerBootstrap – Graylog server up and running.

Launch Graylog Web Interface:


To configure graylog-web-interface, you must have at least one graylog-server node; download the same version number to make sure that it is compatible

         # wget https://packages.graylog2.org/releases/graylog2-web-interface/graylog-web-interface-1.0.1.tgz

Extract the archive and rename it.

         # tar -zxvf graylog-web-interface-1.0.1.tgz

         # mv graylog-web-interface-1.0.1 graylog-web-interface

Edit the configuration file and set the following parameters.

         # vi graylog-web-interface/conf/graylog-web-interface.conf

Set the application secret and can be generated using

         # pwgen -N 1 -s 96

B0B3DB4B025960C1C843C069ABBC22294809A735F9C66AEE4555E558AAE410AE4C82FDDEFDC1BD38576459CB87EF4DCCCF1F6825EAF611E0704CA4178CA8C3F540A22610127E362623B60AC2B3317C459F4C1229BC2BC78C81CB308AC4C09DDD352DCB71

your graylog-web-interface.conf should look like this

graylog2-server.uris="http://127.0.0.1:12900/"
application.secret="B0B3DB4B025960C1C843C069ABBC22294809A735F9C66AEE4555E558AAE410AE4C82FDDEFDC1BD38576459CB87EF4DCCCF1F6825EAF611E0704CA4178CA8C3F540A22610127E362623B60AC2B3317C459F4C1229BC2BC78C81CB308AC4C09DDD352DCB71"
http.port=10100
application.global=lib.Global

Settings Explanation:

  • graylog2-server – This is the list of graylog-server nodes, you can add multiple nodes, separated by commas. Here we have only 1 graylog node.
  • http.port – graylog will bind to this port.

Start the graylog-web-interface in background using the following command,

         # ./bin/graylog-web-interface

Play server process ID is 1764
[info] play - Application started (Prod)
[info] play - Listening for HTTP on /0:0:0:0:0:0:0:0:9000

The web interface will listen on port 9000. Point your browser to it. Login with username=admin and the password you configured at root_password_sha2 on server.conf.

graylog_interface

graylog_interface2

Once you logged in, you will get the following search page.

That’s All, you have successfully installed Graylog2 on CentOS 6.6

Notes:

  1. Its Recommended to extract , configure and launch graylog and elasticsearch servers from root filesystem for better security.
  1. Sometimes Elasticsearch cluster may not find the other cluster nodes, make sure iptables are flushed and linux firewalls are re-configured on every node.
  1. Its convenient to configure an Init script for Graylog-Web-Interface and Graylog server.

Hallo!

Hi, I’m Karthik Samireddy, I am a Linux embedded systems engineer and a Devops engineer,
I am enormous fan of WW2 technologies ranging from Aircraft, Artillery, vehicles, machines to fashion especially the German “Wehrmacht”

I really forget things i did in leaning new technologies and this site is my brain in the internet where i can store and share what i can’t remember. 😀